Last Updated: 2025/12/13. Things are changing fast in SKRIBBLOR, so even if this documentation was updated yesterday or the day before that, there may be some differences in the version you're using that haven't been reflected in the documentation yet!
HOW TO USE SKRIBBLOR
To draw, simply ...draw your stylus across the canvas. Easy enough!
Manipulating the Canvas
- Touch controls
- pinch, twist, and two-finger-drag to zoom, rotate, and pan the canvas
- Keyboard+Pointer controls
- Middle-button drag: move canvas
- Shift+Middle-button drag: rotate canvas
- Ctrl+Middle-button drag: zoom canvas
Keyboard Shortcuts
- E - toggle eraser mode
- S - toggle selection mode
- Esc - return to drawing mode
- Shift+X - mirror the canvas horizontally
- Ctrl+Z - "kill"/remove the top-most stroke from the current layer to the ghost layer (...the what? See below.)
- Shift+Ctrl+Z - "yank"/restore the top-most item on the ghost layer to the active layer
The Button Bar
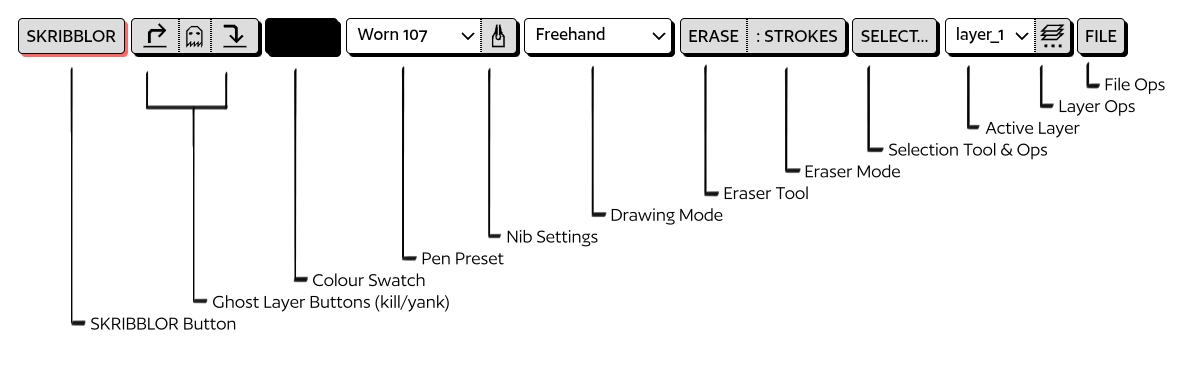
Alright, let's get into all of the buttons and submenus and talk about what they do, even though I think they're pretty straightforward for the most part. First up:
The SKRIBBLOR button

The SKRIBBLOR button opens-up a flap with a few items in it. At the top, there's app info, including the version number and links to the app's "about" page – and this documentation. Below that:
Canvas Size
SKRIBBLOR doesn't work on an infinite canvas model*; instead, it uses a finite canvas which can be of any size you wish, and of course you can change it at any time while you're drawing. There are some preset canvas sizes in the drop-down, and some fields where you can enter custom sizes.
When manually entering the canvas size, you may specify the units to use; for example, "1920px" for pixels, or "8.5in" for 8.5 inches. Any CSS length unit is valid ('px', 'pt', 'pc', 'in', 'Q', 'mm', or 'cm'). If a unit is not specified, 'px' is assumed.
The canvas size is only changed once you hit .
– This will resize the canvas to enclose the entire drawing – including parts of the drawing that may currently be outside of the canvas.
– This will resize the canvas to enclose the underdrawing, if one is set.
 – Clicking this button will allow you to drag and reposition the entire drawing within the canvas.
Canvas Color
There's a swatch in this section for setting the canvas' background color, and a toggle for making the canvas transparent. That's important for when you're using an underdrawing (see below).
Underdrawings
One of the things I've designed SKRIBBLOR to be useful for is "inking" over a sketch. Sketches (underdrawings) can be imported from three sources: the Web (via a URL), a file on your device's local storage, or from your device's camera(s). Click the appropriate button to set the underdrawing, then use the scale, rotation, and translation sliders to get it placed under the canvas where you want it. If/when you want to remove the underdrawing, hit the "clear" button at the bottom.
After you've selected an underdrawing source, SKRIBBLOR will make the canvas background transparent by default. You can always hit the "transparent" toggle to make your canvas background opaque again and hide the underdrawing.
Autosave
SKRIBBLOR runs an autosave every 30 seconds, so whenever you close and reopen the site/app, you should be presented with the drawing you were most recently working on, in (or very near) the state where you left it.
Web users, be frugal!
Web browsers can only store about 5MB of temporary data, which does become a meaningful limitation, especially where underdrawings are concerned. If you load a high-resolution photograph into SKRIBBLOR to use as your underdrawing, you'll quickly see the storage quota gauge at the bottom of the screen fill-up. When this gauge glows red, it means that SKRIBBLOR has overrun its Web storage quota and can no-longer auto-save the drawing. You can keep working on it, of course, but the auto-save state will be stuck where the drawing was before it exceeded the quota.


One way to avoid this happening is to use images from the Web for your underdrawing. When your underdrawing is coming from a Web URL, the only thing that has to be saved is the URL, not the image data itself.
The Ghost Layer Buttons
Okay, SKRIBBLOR doesn't really have undo as you'd expect. When you click the "kill" (![]() ) button (or key Ctrl+Z, which is usually "undo" in other apps), what happens is that the pen-stroke or shape at the top of the active layer (typically, the most recent shape you've made) is removed from the active layer and placed onto a hidden "ghost" layer. The same thing happens when you erase a pen-stroke: it isn't deleted, but rather moved to the ghost layer. To bring back an erased pen stroke or shape, you don't "undo" the erasure by keying Ctrl+Z, you key Shift+Ctrl+Z, or click the "yank" (
) button (or key Ctrl+Z, which is usually "undo" in other apps), what happens is that the pen-stroke or shape at the top of the active layer (typically, the most recent shape you've made) is removed from the active layer and placed onto a hidden "ghost" layer. The same thing happens when you erase a pen-stroke: it isn't deleted, but rather moved to the ghost layer. To bring back an erased pen stroke or shape, you don't "undo" the erasure by keying Ctrl+Z, you key Shift+Ctrl+Z, or click the "yank" (![]() ) button. This takes whatever is at the top of the ghost layer and moves it onto the active layer.
) button. This takes whatever is at the top of the ghost layer and moves it onto the active layer.
It takes a little getting used to, but it's a bit like "undo" had a baby with "cut-and-paste".
For example, one way to move items from one layer to another is by "killing" them into the ghost layer (with the eraser tool, or Ctrl+Z, or ![]() ), selecting a new layer, then "yanking" them from the ghost layer into the active layer (with Shift+Ctrl+Z or
), selecting a new layer, then "yanking" them from the ghost layer into the active layer (with Shift+Ctrl+Z or ![]() ).
).
Colour Swatch Buttons
There leftmost swatch in the color selector section set's your pen/shape colour. You'll first be presented with a palette of hues, and when you select one of them you'll get a pyramid of tints, shades, and tones of that hue. The initial 16 hues are equally-spaced steps around a Hering color wheel, and the default palette gives a very usable/humane selection of 800 colours, in my opinion.
The centre swatch opens-up a halftone palette. Halftone/pattern support is very limited right now, but I'm looking to make this feature much more capable for version 1.3.
The swatch button on the right opens a small palette that contains colours used in the current image.
Pen Presets And Options
The drop-down next to the colour swatch is for selecting the pen preset that you'll be drawing with. The names of the presets give a rough characterization of real-world pens that the preset behaves like.
- Worn 107 is like a Speedball/Hunt 107 nib that's been worn or filed-down to a slightly oblique tip
- Italic M is like a medium-width stub-nib fountain pen
- R. Oblique M /L. Oblique M are right/left oblique counterparts to Italic M
- 512 is a drawing nib, somewhat similar to a Speedball/Hunt 512 or a G-Pen
- Fude is a nib that behaves more like a brush (imagine an italic nib rotated 90 degrees: its stroke is narrow when pulling towards the hand, and wide when drawing across the nib)
- B4 is like a round-headed "bold" lettering/ruling nib (Speeball/Hunt B4-ish)
- Bluntie is like a worn, "fine" felt-tip marker
- Chonk is like a fat chisel-tip marker
All of the presets can be customized/tweaked with the sliders that appear when you click the ellipsis button (...) next to the preset selector. Here's what they mean:
Width – How pointed is the nib? A 'width' setting near zero is like a drawing or copperplate nib, while a width setting of 10 is like a Speedball/Hunt A-1.
Flexibility – How much does the nib "open-up" when pressure is applied? A setting near zero is a very stiff nib with minimal line-weight variation, like a ruling or technical pen; a setting near 10 is very flexible, like a Speedball/Hunt 100.
Obliquity – Is the nib cut square across the tip so that the edge is perpendicular to the holder, or is it cut at an angle. 1.57 (or -1.57) is a square-cut nib; down from 1.57 makes the nib more left-oblique, up from -1.57 makes it more right-oblique, and zero is like a fude nib, where the stroke is wide when drawing across the nib.
Bluntness – Is the nib sharp, or does it have a pad (Speedball/Hunt B-series) or ball (many fountain pens) attached at the end to make a more uniform, blunt line? If you zero-out the Width and Flex settings, you can just use the Blunt setting to specify the width of a monoline stroke, like a technical fountain pen.
Drawing modes
There are four drawing modes in SKRIBBLOR, which can be selected from the drawing-mode drop-down on the button bar. They are:
Freehand – The most natural thing, of course. Just scribble (er, SKRIBBL) your stylus across the screen and lines are made!

Shape – This mode produces filled shapes. As you can see from the animation below, they are automatically closed and filled as you're drawing them.

Straight-edge – Drag from the start point to the end point and a wonderful, perfectly-straight line will be drawn. The pressure and angle of the stylus are recorded at the start and end points, so you can get your lines to widen or narrow over the length of the stroke, and of course the width/sharpness of the nib you're using can change the thickness of the line depending on the angle.

Polygon – A more controlled and rectilinear alternative to the freehand shape mode. Click at the locations of corner points for your polygon (the point is set when the button/pointer comes up, not down), and then click the starting circle to close it, or use your right mouse/pointer button to set the final point. If you want to abort your polygon, you can hit the Escape key, or just close the polygon and kill it (Ctrl+Z, or . ![]() ).
).

The Eraser
The eraser tool is pretty-straightforward. When enabled, you'll get a pink block cursor under your pointer, and when you bump that cursor up against a stroke or shape, it's removed from the active layer and killed to the ghost layer. The size of the eraser is adjustable, via the slider.
Stroke Mode/Segment Mode – To the right of the eraser button is a mode selector button which lets you choose whether you want the eraser to erase entire strokes/shapes (stroke mode), or whether the eraser should just erase the smallest discrete segment of a pen stroke instead (segment mode).

Selection
The selection tool in SKRIBBLOR works like the eraser tool: you don't draw a box around the things you want to select; rather, you click on them or draw across them. The size of the selector can be adjusted with the slider, just like the eraser tool. Once a selection has been made, you can do a number of things with it:
Ordering: up, down, to top, to bottom – Since we're working with vectors and each pen stroke or shape is an object in a stack, we can move the selected objects in-front-of or behind others with these buttons.
Select All – Grab everything on the current layer.
Duplicate – Make a duplicate copy of the selection, in-place. The new copy will become the current selection and the transform tool will be invoked so that you can immediately move the copy to where you want it.
To New Layer – Create a new layer above the current one and move the selected objects into it.
Transform – Modify the position, size, and rotation of the selected objects. SKRIBBLOR's transform gizmo is a little different from the usual box-transform UI . Dragging the circle at the center of the gizmo changes the pivot point for rotations, and the center from which scale changes will take place. The square just to the lower-left of the pivot point is for moving the selection. The round handle on the left sets the scaling axis. while the round handle on the right rotates the selection after scaling has been applied. The square at the upper-right sets the scale factor. Pressing Shift while setting rotation will snap the gizmo to degrees, and pressing Shift while scaling will snap to 10% increments.
In the video below, you can see the user 1) select the text, 2) change the pivot point, 3) rotate around the new pivot point, 4) move the selection, 5) scale the selection's width and height, 6) change the scaling axis, and 7) scale the object more along the new scaling axis.
Layer tools

Your drawing may have an unlimited number of layers with adjustable opacity and a variety of blend modes. Clicking the button next to the layer drop-down will expose the visibility settings for the current layer as well as a row of buttons for useful layer operations:
Ordering: / – Raise or lower the current layer within the layer stack with these.
– This will prompt you for a new layer name, and will create a new layer above the currently active one.
– Removes all pen strokes and shapes from the current layer to the ghost layer.
– "Drops" all pen strokes and shapes from the current layer onto the layer below, and deletes the current layer.
– Prompts you for a new layer name.
– One of the fun things about SVG is that you can make image elements clickable hyperlinks, so that when someone views your SVG (or HTML – see the "Save HTML" section below) document in a Web browser, your drawing can link to other drawings or Web sites. If you're really clever, you can even put some javascript in one of these links to make your drawing start animating or changing colours of what-have-you.
If you want a part of your drawing to be a clickable link, move it to its own layer (use the selection tool to select the clickable elements, then use the "To New Layer" button), then hit the "Link" button in the layer menu. You'll be prompted for the URL of the link.
When a layer is hyperlinked, its name in the layer drop-down will be followed by "[link]", and when you open the layer tools submenu you will see that the "Link" button has changed to "Unlink". This, of course, is how you remove/change a link.
File Import/Export
The File button opens-up a row of buttons which let you export your drawings in a few different formats, and import SVG files you'd like to edit.
– Erases the current canvas and all layers. The current canvas size and background colour are retained.
– SKRIBBLOR will open any SVG file you throw at it, but it's really only designed to edit files that have been created with it. See the section below, "On Loading SVG Files" for details.
– Saves the current drawing to a plain-ol' SVG file. Note: underdrawings are not saved in the SVG document ['though they probably will be in the near future].
– This will create an HTML document that contains the SVG drawing. The chief advantage of doing this is that on Android [is this true of iPadOS/iOS as well?] there is no default application for viewing SVG files. Wrapping the SVG in an HTML document makes it easier to share with others for viewing, because Android will open an HTML document in the user's preferred Web browser.
(@150ppi, @300ppi, @600ppi) – This will export a rasterized version of your drawing at the specified resolution. Technical note: SVG files are 96ppi by default, so if you have specified your canvas size in pixels, its "natural" print dimensions are those pixel dimensions divided by 96. Conversely, if you've specified your canvas dimensions in inches, the "natural" pixel dimensions (the size on your screen when zoom/scale is set to "1") will be your inch measurements times 96.
On Loading SVG Files
While SKRIBBLOR is more than happy to load any ol' SVG file you throw at it, you won't necessarily be able to do much with it. SKRIBBLOR only knows how to manipulate a subset of the types of geometry that SVG has to offer, and it expects files to be structured in a particular way. The nerdy details follow:
Canvas Manipulation Controls
Along the bottom of the screen are some controls for adjusting the rotation, zoom, and panning of the canvas. For the most part, you'll probably be doing these changes either by pinching, twisting, and dragging your screen if you're on a tablet, or using cursor+keyboard controls if you're on a notebook/desktop computer. It can be useful to have these auxilliary controls available though (for example, the touch manipulation is really buggy on Firefox/Android at the moment).
The last four elements in this row are:
 – Toggle horizontal canvas mirroring (Shift+X)
 – Toggle full-screen mode
– Resets the document to its initial zoom, removes all rotation, and registers it to the the top-left corner of the screen.
The last element in the row is a gauge showing you the size of the document relative to the autosave file-size limit (just over 5MB). You can continue working on drawings that are larger than 5MB in size, but the browser will be unable to auto-save your progress. Android users do not have an auto-save size limit.
Tips for Best Performance
The resolution-independence of vector graphics come at the expense of computational complexity, and when you're dealing with drawings that have tens of thousands of pen-strokes, the load on your computing device can be quite large – and the responsiveness of your drawing app can noticeably slow.
If you're running into this problem, I recommend using layers to contain parts of your drawing, then turning layers off that aren't currently being worked-on. When a layer's visibility is turned off, the app doesn't have to do the expensive computation to render it all the time, and this can keep SKRIBBLOR drawing more smoothly.
Notes On Line Quality
The quality of line that you'll get in SKRIBBLOR unfortunately depends rather a lot on the device that you're running it on. The pixel density of your screen and its refresh rate are both factors that affect the smoothness of lines. A higher refresh rate means more stylus sample data can be taken per second, and a higher pixel density on your display means greater sample precision.
I primarily use SKRIBBLOR on two devices: I run the Web version in Firefox on my laptop, and the Android version on a Samsung Galaxy Tab S9 FE. The tablet, which has a very high resolution display running at 90Hz produces better lines than my laptop, which has a standard FHD (1920x1080) screen running at 60Hz. Despite the fact that the Wacom tablet I use with my laptop has tremendously high tracking resolution, that precision is not passed on to the browser. So it goes!
Nevertheless, there are advantages to using SKRIBBLOR on my laptop: it's much more computationally powerful than my tablet, and so when drawings start to get large and complex, the laptop performs better. Also, zooming-in to the canvas for detailed work effectively increases the tracking resolution of the stylus, so I find that the drawings I create on my laptop are generally of equally high quality to those that I produce on my tablet – I simply work zoomed-in more often on the former.
I have some strategies in mind that should improve this situation in the near future. For SKRIBBLOR 1.0 though, these are the facts.